There’s a blank wall in almost every home that’s just waiting for a story. A gallery wall is how you tell it - a beautiful, growing collection of your favourite photos, quotes and memories, all in one place. And the best part? You don’t need nails, a drill, or a single hole in your wall to make it happen.
Whether you’re styling a brand-new home in Cape Town, a rental flat in Joburg, or a cosy corner in Durban, this guide walks you through everything you need to know to create a gallery wall you’ll love. Let’s grow your wall.
What is a gallery wall (and why South Africans love them)
A gallery wall is simply a curated group of prints arranged together to make one eye-catching display. Instead of a single big frame, you build a layout from several smaller pieces - photos of family, holidays, your kids, your pets, or artwork and quotes that mean something to you.
Gallery walls have become one of the most popular home decor trends in South Africa because they’re personal, flexible and easy to live with. They work in any room, suit any budget, and - when you build yours with PhotoBLOX - they can grow with you over time. Add a new memory whenever you make one.

Step 1: Choose your wall
Start by picking the wall that deserves the spotlight. Great gallery wall spots include the area above a couch, along a staircase, in an entrance hall, above a bed, or in a hallway that feels a little bare. Look for a wall that people naturally see when they walk into the room.
Tip: stand back and take a photo of the empty wall on your phone. It helps you picture the space and plan your layout before you commit to anything.
Step 2: Pick your shapes
This is where the fun starts. PhotoBLOX woodprints come in a few signature shapes, and mixing them is how you create a look that’s completely your own:
-
SquareBLOX - our most popular shape. Clean, classic and perfect for a structured, uniform grid.
-
CircleBLOX - soft and playful. They work beautifully in kids’ rooms and add lovely movement to a layout.
-
HoneyBLOX - hexagon woodprints that keep on growing. Ideal if you love an organic, honeycomb look.
-
MoonBLOX - add a touch of luxury and a different silhouette to your wall.
You can keep it simple with one shape, or mix and match shapes and sizes for a more relaxed, gathered feel. There’s no wrong answer - it’s your story.
Step 3: Plan your layout
There are three layouts that almost always look great:
-
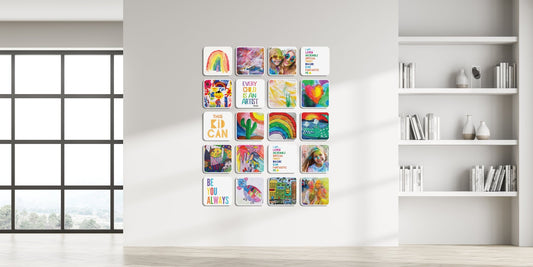
The Grid - same shape, same size, evenly spaced. Crisp, modern and calming. SquareBLOX are perfect for this.
-
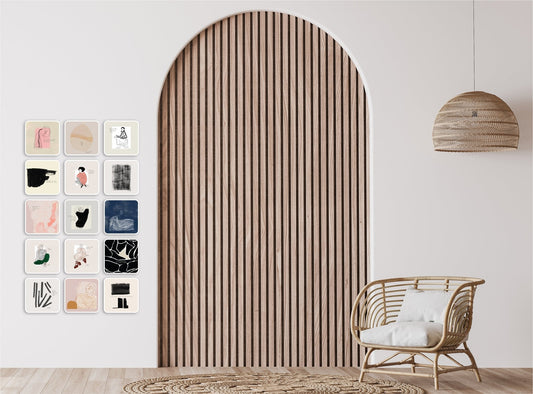
The Organic Cluster - mix sizes and shapes with small, even gaps. Relaxed and full of personality.
-
The Growing Wall - start with a few pieces and keep adding outward over time. HoneyBLOX and CircleBLOX are made for this.
Before you stick anything up, lay your blox out on the floor or the bed first. Shuffle them around until the arrangement feels right. A good rule of thumb is to keep an even gap (around 3–5cm) between each piece for a polished finish.
See our Inspiration page for some layout ideas.
Step 4: Choose and style your photos
The secret to a gallery wall that looks pulled-together is a consistent feel across your photos. Try using the same filter or tone across all your images before you upload them - it instantly creates a unique, uniform look.
Neutral and earthy tones are especially stunning on wood, because the natural grain of the woodprint comes through and adds warmth. If your photos are a bit mismatched, a free editing app like FLTR can help you bring them into the same palette in minutes. Want to break up your photos? Add a few of our free downloadable quotes or artwork in between to start your own conversation wall.
Step 5: Hang it - no nails needed
Here’s the magic. Every PhotoBLOX comes with our re-stickable nano tape that grips almost any surface - no nails, no drill, no damage. Simply peel, press, and you’re done. If a piece isn’t quite straight, lift it off and re-stick it until it’s perfect.
That makes gallery walls ideal for renters, for plastered or painted walls, and for anyone who likes to change things up. (We’ve got a full renter-friendly hanging guide if you’d like the step-by-step.)
Step 6: Let your wall grow
The beauty of building your gallery wall with PhotoBLOX is that it’s never “finished.” Because every block is a consistent size and shape, you can keep adding new memories over the months and years. New baby, new pet, new adventure? There’s always room to grow your wall.
Gallery wall ideas to inspire you
-
A black-and-white family grid above the couch for a timeless, elegant look.
-
A playful CircleBLOX cluster in a nursery, mixing baby photos with fun artwork.
-
A warm, neutral-toned HoneyBLOX honeycomb that grows along a feature wall.
-
A travel wall mixing landscapes, candid moments and a favourite quote or two.
-
A pet tribute corner celebrating your furkids (PETBLOX are perfect here).
Frequently asked questions
How many pieces do I need for a gallery wall?
It depends on your wall size, but most people start with between 6 and 12 blox and add more over time. Our combo sets are an easy, affordable way to begin.
Will the tape damage my paint?
Our nano tape is designed to stick and re-stick without damaging your wall. For best results, apply to a clean, dry, smooth surface.
Can I use photos from Instagram or Facebook?
Yes - those are some of our favourites! Just upload the original photo where you can, as social media compresses images and that can affect print quality on larger sizes.